Investigating Bulk Fermentation
Why is the bulk fermentation period important?
Judging how long sourdough needs to bulk ferment can be pretty tricky. If you under-ferment your dough, the final crumb can turn out gummy; this is often mistaken for an underbaked loaf. The loaf is also inclined to over-spring, resulting in a crumb with big, random holes or channels running through the loaf.
If you over-ferment the dough, you run the risk of the gluten structure degrading and the loaf turning into a puddle of goo before your eyes, never to be retrieved and destined for the bin.
I would say that more often or not, I underproof my dough; I live on what I consider to be the “safe” side. My loaf will always spring in the oven and look great on the outside, and I try to ignore the rather annoying random openings in the crumb.
Why compare the different increases in fermentation?
As I’m embarking on a journey to track fermentation times in my newly converted fermentation chamber, I need to ask myself, what is considered a fully fermented dough?
Some recipes call for the dough to expand in volume by as little as 30% while others suggest a full-on 100% increase. Before I decide on the exact volume increase I will track, I want to know what the difference is.
I settled on comparing a loaf that ferments to 50% of its original volume and one that ferments to 100%. This would also help me understand more about the process and improve my baking while stepping out of the under-proofed comfort zone!
This experiment would also give me the opportunity to observe the dough and tune my senses, helping me to understand what’s going on during the process. I want to learn to read the dough so that no matter the recipe I am using, I will have a good idea of what’s going on.
The test & the recipe
I decided to use my everyday sourdough recipe, which uses a high-protein flour and 70% hydration. I mixed up 1500 grams of dough and left it to rest for 15 minutes in the fermentation chamber, which was dialled into 25 degrees Celcius / 77 degrees Fahrenheit.
Add my free sourdough calculator to your baking tool kit.
After 15 minutes, I removed the dough from the chamber. I gave it a quick knead to make sure it was smooth, and the starter was well dispersed throughout the dough. I removed 100 grams of dough and compacted it into a jam jar as a control piece. I marked the level the dough came to on the outside of the jar and then marked where the dough would come to when it increased by 50% and 100% in volume. I covered the main dough and put it in the chamber with the control piece.
Thirty minutes later, I removed the main dough and gave it a giant lamination on my bench. Back into the chamber, it went for another thirty minutes, followed by a stretch and fold, and back into the chamber yet again.
After another thirty-minute rest, I removed the main dough and equally divided it into two pieces. I gave them both a gentle stretch while shaping them into neat dough balls. I placed each of them in their own bowls, covered them and popped them back in the chamber.
The control dough hit the 50% rise mark after a total of four hours. I removed one dough ball from the chamber. I took the opportunity to smell and touch the dough to really try and understand its characteristics at this point in its journey.
It felt inflated but very stable; it certainly didn't feel like it was about to collapse on itself. I definitely knew there was a lot more gas in the tank. The dough didn't smell raw at this point; the fermentation smelled new and a little sweet, sour, but not overly so.
After shaping the dough, I gave it a quick bath in rice flour and placed it in a banneton. I covered it with a plastic bag and placed it straight in the fridge, where it would sit until the next day.
The control piece of dough hit the 100% mark after another two hours (six in total). This dough felt amazing; it had expanded appreciably, but it was still strong. This dough didn't feel like it was about to collapse either. The fermentation smelled a little stronger, and I couldn't detect any sweet notes.
I was very careful not to degas the dough when I shaped it. I placed it in the basket after dusting it with rice flour. I covered it with a bag and it and joined its companion for an overnight cold proof in the fridge.
The bake
I was interested to see how the two doughs would change overnight. Although they were retarded in the fridge, they would continue to proof in the basket during this period. It takes several hours for the dough to cool down enough to really slow the fermentation.
As both doughs were cold when I turned them out of the basket, they both behaved well; neither ran the risk of dissipating into a puddle before my eyes. They were easy to score too; the dough sliced smoothly and didn't open up too much before sliding into the oven.
My oven had been preheated to two hundred and twenty degrees Celcius, four hundred and thirty degrees Fahrenheit, with my baking stone placed on the lower third shelf. Both loaves were baked for twenty minutes covered and twenty-five minutes uncovered.
The result
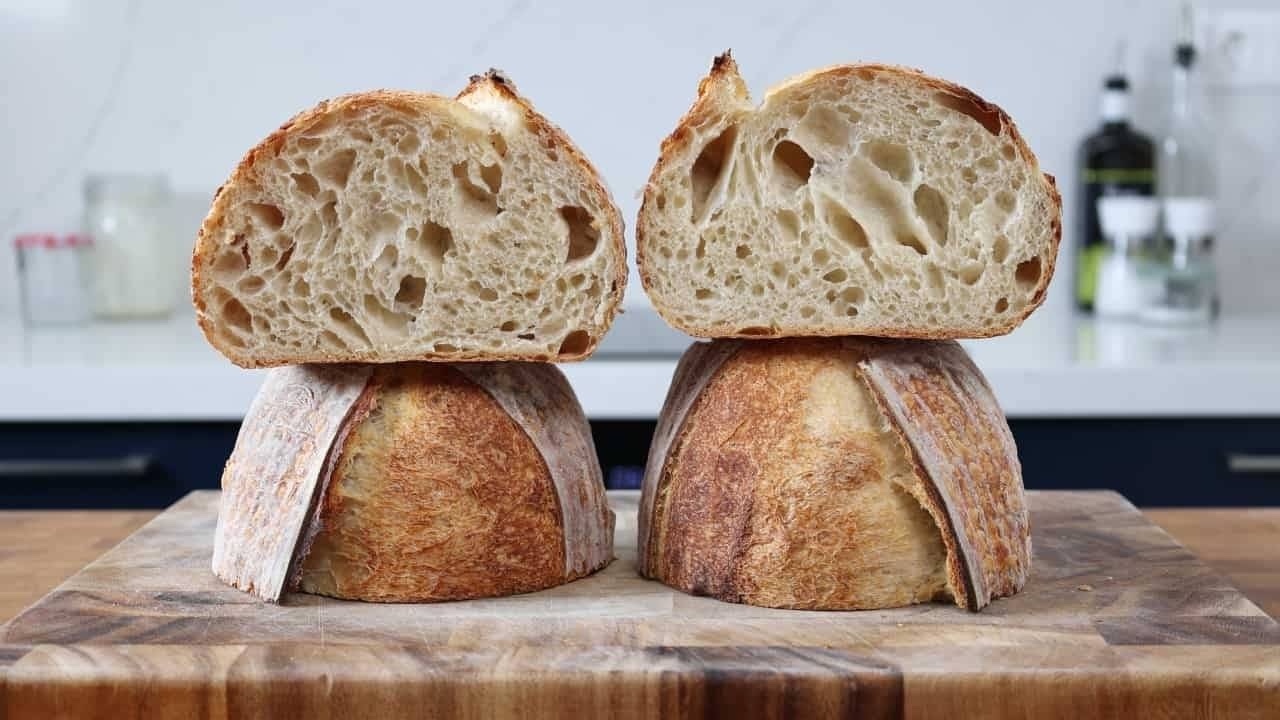
Both loaves looked really good from the outside, and to be honest, the loaf that was proofed to 50% looked very similar to my normal bakes. The loaf that had been fermented to 100% didn't jump up as high during baking, but expanded into more of a full loaf.
The real results lie hidden in the crumb. After slicing, I could see the telltale large craters in the loaf that had fermented to 50%. The crumb wasn’t gummy, but it had a completely irregular structure, and there were really annoying holes that I’d be losing my jam through while enjoying my morning toast.
The loaf that was fermented to 100% had a much more even crumb, none of the holes were too big and overall the loaf looked really, really good.
What did I learn?
Every aspect of sourdough is intrinsically linked to another, so things are never as simple as they may first appear!
If I were baking in a moderate climate and planning on retarding the dough overnight in the fridge, I would opt to push the bulk fermentation so that the dough expands by 100%. I may even push this a little further by proofing the dough at room temperature for an hour or two in the basket.
The main increase in volume happens towards the end of the fermentation period. Remember that the dough took four hours to expand to fifty per cent, but only another two hours to expand to one hundred per cent.
So, if I were baking in a hot climate and pushed my fermentation to 100% increase in volume, there is a good chance it would overproof in the basket, even when placed directly in the fridge after shaping. In this scenario, I’d be inclined to reduce the bulk fermentation.
The flour I used has 13,2% protein and builds a really strong dough. If I were making a softer dough with less strength, I would also consider reducing the bulk fermentation so the dough strength wasn’t tested to its maximum.
How can you track bulk fermentation accurately?
Judging bulk fermentation by eye alone is one of the hardest parts of sourdough baking. If you want a clearer, more reliable way to know when bulk is actually complete, you can read more about how I approach it here:
See how I track bulk fermentation accurately