How I Setup my Kitchen and Film my YouTube Cooking Videos
In this post I'm going to be explaining how I film YouTube videos in my kitchen at home. If you are trying to figure out how to film around the subject of cooking then I hope this will help you out in your quest.
I've linked to my YouTube video below where you'll be able to see exactly how I set my kitchen and equipment up, and the camera angles I create.
I'm no Peter McKinnon but I hope I have learnt enough over the last couple of years to produce informative cooking content, produced to a good standard, that's easily consumable.
This isn't supposed to be a technical post on equipment, if you need that then head over to Peter's channel. This post explains the equipment I chose to suit my kitchen and the shots I wanted to get.
I'll link to the equipment throughout the post. They are Amazon affiliate links that I earn commission from. The main point of showing these is to enable you to check out the specific equipment I'm referring to. You can then do your due diligence, research and price comparisons.
I love learning and ultimately improving, so if you have any tips that you think may help me out then do get in contact.
I don't think we ever reach the point where we stop thinking that a new piece of kit will improve our filming. Unfortunately it's not that easy and great kit doesn't equate to great content. Interesting ideas, good execution and repetition equal great content (eventually).
My first video
Enjoy filming with what you have, whether that be a budget DSLR or your phone. Get as good as you can with that piece of kit before moving on to something better.
I filmed my first YouTube video using a canon M50, a piece of wood as a bench, which was propped up on books at one end (I think you can actually see the wood bouncing in the video) and a £20 budget light from Amazon. And to be honest, I think the quality of that video would have been better if I had used my iPhone.
I'm still very proud of that first video. I had never done anything like that before and I struggled throughout the entire process. I was showing how I ferment sauerkraut in the video, and what would normally be an easy process, was greatly complicated by the filming.
Someone (actually a friend) pointed out to me quite recently that the quality of that first video was awful and I should delete it. But I don't measure my content in that way. Each time I film a new video I want to improve on the last. I enjoy looking back at my previous content and seeing it as waypoint in a long journey.
If you are interested you can see that first "spicy" habanero sauerkraut video by clicking here.
When I started my YouTube channel I had a kitchen with lots of light. The walls were painted a strange yellow colour that stamped its mark on the colour of my first videos. It still makes me smile today.
Whilst filming in that kitchen I didn't need to worry too much about space, I could move tripods and light stands around easily (I'm not saying I did it well! But I had the room at least).
The new but small kitchen!
About a year ago as of writing this, we moved to another apartment in Athens. Oh boy, did I know that filming in that kitchen was going to be a challenge!
The floor space measures 1.8m x 2.4m, that's a total of 4.32m2. In that floor space I need to fit me and a workbench. So, I have very little spare space for tripods or light stands.
This is how I managed to get four camera angles, including a top down rig and a key light in that space...
Front, main Camera (angles 1 & 2), Canon R6
I use a Canon R6 as the main camera and it's located directly in front of me while I'm cooking. The R6 is mounted on a tripod that's pushed right back against the wall.
I needed a camera and lens combination that would shoot wide enough to fit me and the work bench in the frame. Most DSLRs that shoot in 4K crop in, which would mean cutting my head or the bench out of the shot.
I chose the Canon R6 with a 24-105mm lens as it films in 4K at pretty much its full frame. It's perfect for squeezing everything I need into the shot. I mount the camera on a Manfrotto compact tripod with a Neewer ball head mount.
This has one extra bonus. As I film most things in 4K I can crop in on that shot during editing. That's a real bonus as I get one extra camera angle (a front close up shot of the bench) or I can punch in on something important. Doing this in 4K as opposed to 1080p means the shot doesn't get overly pixelated when I crop in.
Click here to see the Canon R6
Click here to see the Manfrotto compact tripod
The purpose of these links is to show you the equipment I used. Please make sure you do your research and price comparisons. If you have any questions let me know. These are Amazon affiliate links.
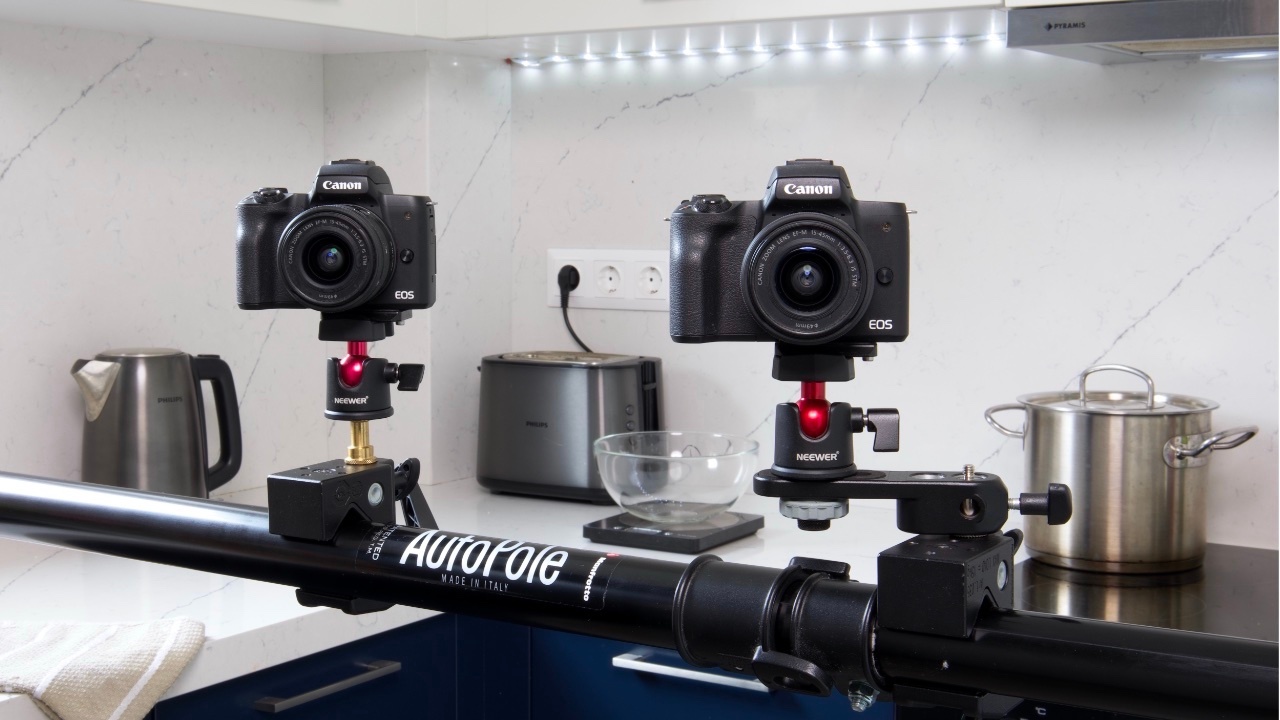
Side, Camera 2 (angle 3), Canon M50
My second camera is mounted on a small tripod and sits just off of the centre to my left hand side. This shot is lower and shows a different perspective of my work bench and is great if I need to show you another angle.
For this shot I use a canon M50 (MK1) with the 15-45mm kit lens. I don't get much flexibility to punch in on the shot as it's filmed in 1080p, and if I zoom in too much it gets a little pixelated. This angle is pretty much framed up in camera.
Click here to see the Canon M50
Click here to see the Compact Manfrotto tripod
The purpose of these links is to show you the equipment I used. Please make sure you do your due diligence, research and price comparisons. If you have any questions let me know. As an Amazon Associate I earn from qualifying purchases.
Top Down, Camera 3 (angle 4), Canon M50
And finally I have a Canon M50 with the 15-45mm kit lens set up on an overhead rig that shoots the top down view of my work bench.
This top down rig took me ages to research and I needed to buy several different elements to bring it together. remember i have no floor space for tripods or stands. I'll break it down into components with the Amazon affiliate links so you can research the products.
I use a Manfrotto Autopole to span the two walls above my workbench. This is a good investment. It's built to last and in a geeky way I love the engineering, it feels like it will last forever. My pole extends to 2.7m and is rated to hold 1.8 kilos. If I had to but this again I would buy the pole that extends to 3.7m. This one piece of kit was a game changer for setting up my kitchen.
I use two Manfrotto super clamps that are attached by a joining stud to clamp to the autopole. These clamps are heavy duty and perfect for the job.
I attach vertical telescopic pole to the super clamp. I removed the plate which is used to attach it to the wall or ceiling. This extends to 60cm, make sure it has the reach you need. It's budget friendly and I've been using it for about a year with no issues. It works perfectly for my needs.
To the bottom of the telescopic Neewer pole I connect a Manfrotto camera / umbrella bracket.
I connect a Neewer ball head mount to the Manfrotto camera plate. Now the rig is ready to receive the camera. If you are considering a multi camera setup then I would suggest choosing a mounting system that you like and buying several of them. Attaching the same ball heads to your tripod gear and the same plates to your cameras, makes switching gear around a breeze.
Component for this top down rig:
Click here to see the Canon M50
Click here to see the Manfrotto Autopole
Click here to see the Manfrotto Super clamps
Click here to see the Neewer wall / ceiling pole
Click here to see the Neewer ball head mounts
The purpose of these links is to show you the equipment I used. Please make sure you do your due diligence, research and price comparisons. If you have any questions let me know. As an Amazon Associate I earn from qualifying purchases.
Lighting the kitchen
The kitchen has a window and most days in Greece it's sunny. I have one good light source already, natural light from the window floods the work bench with light from my right hand side. I use a Neewer 90cm x 120cm diffuser to soften the light.
I use a key light attached to the ceiling in front (and just to left) of me to provide additional light. I use the Godox SL60 which is 60w LED video light. this was a budget friendly light but it has worked very well for me. I use a Neewer parabolic soft box attached to the Godox to soften the light.
The kitchen ceiling is constructed out of plasterboard and I used dry lining fixings to secure a light fixing plate. When the kitchen was being renovated I asked the electrician to install a power socket up high next to the ceiling. After a few weird looks, I got my socket. That saves any trailing cables in the kitchen.
Small details like this make all the difference.
I have noticed that when it is cloudy or later in the day when I loose natural daylight from outside, I need extra light. So I will be upgrading to the Godox Amaran 200d.
Click here to see the light ceiling mount
Click here to see the Neewer 5 in 1 reflector / diffuser
Click here to see the Godox SL60
Click here to see the Godox Amaran 200d
Click here to see the Neewer Parabolic Softbox with Bowens Mount
The Bench
Many people have asked me what type of wood my bench is made out of and how I take care of it. This is actually a fake wooden kitchen island / butchers block that I bought from Ikea.
It is perfect!
At 62cm x 79cm it's a great size to work on, but it also fits through my doorways. This is super important as I keep it in my office when I'm not filming.
I removed the feet and attached thick felt pads so that I can slide the bench easily over my wooden floors.
Click here to see the work bench on the Ikea website
(This is not an affiliate link)
Editing
By using multiple camera angles I can hit record on the three cameras and concentrate on what I'm cooking. I know that every element of my workflow is being captured.
But the magic really happens in post production. I edit my videos using Final Cut Pro which is powered by a 16GB M1 Mac Mini, I use two external Sandisk hard drives to edit from. I mention the hardware and software because it's important for this editing process.
After I have imported the multiple clips into Final Cut Pro, I create a synchronised multi cam clip. Now I can edit that as one clip and have the ability to switch between the different camera angles with the click of a button. As the clips are synced perfectly it's an absolute breeze.
I'm even able to create a fourth camera angle by punching in on the wide 4K shot. So essentially I end up with four camera angles.
I do need to invest time into creating and framing each shot within the multi cam clips. But it's worth it.
Why did I mention the hardware and software? I used to edit using an older Mac Mini and Premier Pro and I couldn't create or edit the multi cam clips. I made the switch to Final Cut Pro and I was able to edit 3 1080 clips into a multi cam clips and edit... slowly.
After upgrading to the M1 Mac Mini I can create a multi cam clip with two 4k clips and two 1080p clips. Editing is a breeze with no stuttering or issues. Now, I'm no tech guru and I'm sure this is possible with Final Cut Pro and other hardware, but I have no experience on how to do that.
I'm really happy with this setup, but I have some improvements I'll be making throughout 2022 to improve the existing angles, create a new one and improve the overall production quality.
If you are interested in how I bring those clips together during editing process then let me know and I'll put a video together on my process.
That's a breakdown of how I set my kitchen up to film my YouTube videos. I hope the information has been useful and if you have any questions do let me know. Happy filming!
If you enjoyed this blog and would like to support ongoing content creation and help keep the website ad-free, you can click below to make a contribution.
As an Amazon Affiliate, I may earn a commission from qualifying purchases