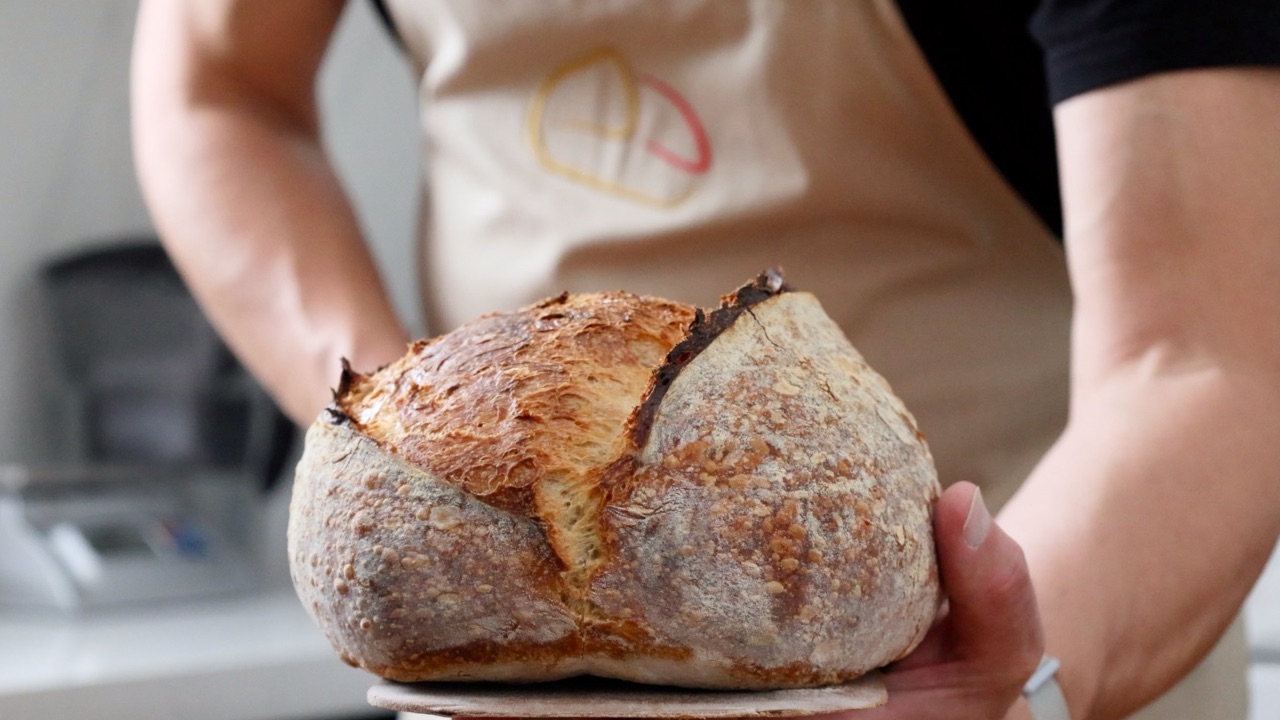
An Autumnal Malted Barley Sourdough

Using malted barley produces a wonderfully aromatic loaf of sourdough with textural interest and slight orangey brown colour to the crumb.
Using malted barley has been an amazing entry into the world of malted grains. The Carared malted barley I use in this recipe was sourced from a brewing company, who’d have thought it!
This recipe is the perfect introduction to using malted grains in your baking and will open up a world of flavour to you!
I’ll walk you through my entire process in this recipe blog. If you are a seasoned baker you’ll find my recipe formula below which will have all the details you need. You’ll also find a printable quick reference recipe card too.
Don’t forget, there is a full recipe tutorial video further down the blog too.
The Carared malted barley & milling
How to mill the malted Barley
The vitals & baker’s percentages
Adjusting for temperature
The baking timeline
The equipment you’ll need
The recipe
The recipe video tutorial
Quick Reference Printable Recipe Card
Get the Sourdough Calculator
The Carared Malted Barley & Milling
In this recipe I’m using Carared malted barley from Weyermann brewing company, check out the webpage to see a detailed overview of the product and the Malt aroma wheel.
Bryan, a viewer of our YouTube channel kindly sent me two malted grains to experiment with. While I have only scratched the surface I believe there are great advantages to using these types of malts.
I would suggest looking at brewing companies locally or nationally to source the malted barley (and see what else tickles your fancy).
There are a variety of malted grains to choose from, don’t feel constricted and use the same as I chose, explore!
This Carared malted barley is non-diastatic and only affects the flavour and colour of the bread. Make sure you choose non-diastatic malted grains to use in this recipe.
The brewing companies offer a gateway into a world of flavour for sourdough. I’m extremely grateful to Bryan for introducing me to the wonderful universe of malted grains.
How to Mill the Malted Barley at Home
I use a Nutrimill to mill my grains at home and it works perfectly for the malted barley. No matter the brand of mill you use, the milling stones need to be opened up so they produce a very coarse grind. This results in a loaf with wonderful texture and visual interest.
As we only need 22g you can get creative. All you need is a little imagination and in some cases, a touch of patience and some muscle power.
A spice grinder works perfectly if you gently pulse the machine on and off to maintain a coarse texture.
A heavy mortar and pestle works well. Grinding in batches of 5-10g will produce the best result.
The malted barley can also be placed in a ziplock bag and crushed (bashed) with a heavy rolling pin (stone or ceramic), a heavy-based pad or a flat metal meat tenderiser. Make sure your bag is resting on a hard surface that won’t get damaged!
The Vitals & Baker’s Percentages
My kitchen held an average temperature of 25C/77F throughout the process.
The recipe yields 800g of dough and uses 80% strong white bread flour (protein content 13%), 15% stone ground wholewheat flour, and 5% cracked malted barley.
The hydration is 78% and the salt content is 2%.
I use 15% levain @ 100% hydration in this recipe.
I’ve added the recipe sheet below so you can see the formula in more detail. Don’t forget you can download a copy of my sourdough calculator to quickly and easily make adjustments to this recipe.
Recipe Formula

The Baking Timeline
The timeline is based on a kitchen temperature of 25C/77F.
Day 1
22.00 Mix the levain (5m)
Day 2
10:00 Mix the dough (15m)
10:30 The dough gets a quick knead (5m)
11:15 First lamination or stretch (5m)
12:00 Second lamination or stretch (5m)
12:45 Third lamination or stretch (5m)
16:00 Shape the dough for proofing (10m)
18:00 Flash chill in the freezer (2m)
19:00 Cold proof in the fridge (2m)
Day 3
08:00 Bake the loaf (10m)
08:45 Leave to cool
Total time: 34h 45m
Hands-on time: 1hr (approximately depending on experience)
Adjusting for Temperature
The temperature of my kitchen during the fermenting of the levain and the dough was 25C/77F.
Warmer kitchens
The higher your kitchen temperature the faster the fermentation process will happen for both the levain and the sourdough.
The dough will also be warmer which will make the dough feel softer, and in hot conditions, it may be stickier and possibly more difficult to handle.
To combat problems that may occur in warmer temperatures you can reduce the hydration a little to stiffen the dough. You can mix your dough to a lower temperature, and use a cool box or cool bag with an ice brick to regulate the temperature during fermentation and slow the process down.
Decreasing the amount of sourdough starter you use to inoculate the levain, and the amount of levain you use to inoculate your dough will slow the process down.
Cooler kitchens
The opposite may occur, your dough may feel stiffer and the fermentation process will take longer. I think this is easier to adjust for than a warmer scenario.
In really low temperatures the process can grind along at a snail's pace or stall. In these circumstances, you can mix your dough to a warmer temperature, and keep your dough somewhere warmer to ferment.
If your dough feels stiffer you may want to increase the hydration touch.
Increasing the amount of sourdough starter you use to inoculate the levain, and the amount of levain you use to inoculate your dough will speed the process up.
In either case, in a warm or cool kitchen, bake the recipe as detailed the first time, keep my suggestions in mind and make alterations on the second bake.
Don’t forget that there are several factors to consider when adjusting hydration. Using a sourdough calculator is the easiest and most accurate way to do it. You are welcome to use my recipe calculator (it’s completely free).
The Equipment You’ll Need
The malted barley isn’t hard to crack and while I’m using my Nutrimill to grind the barley you could use a mortar and pestle or spice grinder. (Read the section below on milling at home for ideas).
A good set of digital scales is essential for weighing the ingredients accurately. I am using an oval banneton to proof my sourdough but you can use a bowl lined with a cloth that has been dusted with flour.
A bowl scraper and bench scraper aren’t essential but they are great for moving the dough around and cleaning up properly cutting down on wastage.
If you are baking in a cooler or warmer climate it may be advisable to monitor the temperature of the dough and the room with a Thermapen.
I use a baking stone for baking my sourdough but you can use a dutch oven or a baking pan.
As an Amazon Associate I earn from qualifying purchases.
The Recipe
The Levain
I mix the levain at 22:00 the evening before I’m going to mix the dough.
In bakers percentages, I use about 10% of my sourdough starter to inoculate my levain. That’s quite a small amount, but it has a benefit, it slows down the time it takes my levain to ferment, which means at 25C/77F I can leave it overnight and it is ready to use the next morning.
If your kitchen is warmer the levain will be ready quicker, and in cooler kitchens, the levain may take a little longer.
Increasing or decreasing the amount of sourdough starter used to inoculate the levain will speed up or slow down the process retrospectively.
This recipe makes a touch more levain than needed to account for any residue stuck inside the jar.
Ingredients
4g sourdough starter
36g strong white bread flour
36g water
Mix the sourdough starter, water and levain together in a jar for a minute or so until well incorporated. The mixture doesn’t need to be smooth, it will sort itself out during the fermentation period.
Make sure your jar is large enough to accommodate the mixture quadrupling in volume.
Mixing the dough
Don't forget you can watch the video tutorial for an easy walk through of each step.
Ingredients
323g strong white bread flour
67g stoneground wholewheat flour
22g Malted barley grains
314g water (25C/77F)
8g salt
67g ripe levain
The first job is to crack open the malted barley. You could grind it finely but I prefer to keep it course as it adds texture and visual interest to the crumb.
I use a Nutrimill grain mill which is perfect for the job, I have listed some creative ways to do this without a mill. Check the section above.
Add the strong white bread flour, stoneground wholewheat flour and malted barley to a bowl and blend the flour together.
In a separate bowl dissolve the salt into the water. Add roughly a quarter of the flour mixture to the water and stir with a spoon to roughly blend the flour and water together. Don’t worry if it’s a little lumpy.
Add the levain to the water and flour mixture and blend together. Again, this doesn’t need to be completely smooth but make sure the levain is well dispersed through the mixture.
Add the rest of the flour to the mixture. Bring it together with a spoon cleaning down the sides of the bowl as you go.
Once the mixture becomes too stiff to stir, wet your hand and pinch the dough together until you’ve formed a rough dough.
Cover and leave the dough to rest for 30 minutes at room temperature.
Quick knead
After the thirty minute rest turn the dough out onto your work surface and knead the dough for about a minute or so.
This is a gentle kneading process and the goal is to make sure everything is well mixed as opposed to building strength in the dough.
The long fermentation time will naturally build the strength we need in the dough.
When you are satisfied the dough is well-mixed, shape it into a ball and place it back in the bowl, cover it and leave it to ferment.
Laminations or stretching
After 45 minutes turn the dough out onto your work surface and gently stretch it out into a large square or rectangle.
Fold the dough into thirds, bringing the right side over into the centre and the left side over that.
Now fold the top into the centre third of the dough and the bottom over that. You should be looking at a relatively neat square of dough.
Shape the dough into a ball and place it back in the bowl and cover it.
You can see the process in more detail in the video tutorial below.
Repeat this process two more times with a 45-minute rest between each stretch and place the dough back, covered in the bowl.
Shaping
My dough took 3 hours and 15 minutes after the final lamination to increase in volume by 75%.
When your dough has increased to this volume dust the top of the dough with flour while still in the bowl.
Gently release the dough from the sides of the bowl and gently turn it out onto the work surface with the floured side down.
Gently pull the left side and the right side of the dough outwards and fold over into the centre. Now roll the dough up into a cylindrical shape which should be about the same length as your basket.
During shaping the aim is to handle the dough firmly developing tension but without degassing it completely.
Seal the edges of the dough together where they meet. Gently dust the dough with rice flour and place it in the basket with the seam side facing up.
Place the basket of dough into a large bag. Fold the edges over to slightly inflate the bag and stop it from touching the dough.
Leave the dough at 25C / 77F to proof.
You can watch the shaping process in the video below.
Cold Proof
The dough is ready to cold-proof when it has risen appreciably in the basket. This can take anywhere from 1-2 hours, keep an eye on the dough!
Gently poke the dough with your finger. It should feel inflated but relaxed, it shouldn’t feel taught like a drum skin or floppy like it’s about to deflate.
The depression left by your finger should gently push back out over 3-4 seconds. If the dough springs back quickly the dough isn’t quite ready.
Understanding and reading your dough takes practice, it's a case of trial and error.
Don’t worry about it too much but try to remember how it looks in the basket, how it feels to touch and how the dough responds when pressed.
Carry this information forward to the next bake. You will get the hang of it, it is just a matter of repetition.
At this point, you can jump straight to the baking process but I prefer to cold-proof the dough overnight and bake it the next day.
After the dough is proofed I pop it back in the bag. I chill it in the freezer for 30 minutes and then place it in the fridge to cold-proof.
Bake
Preheat your oven to 220C / 430F. If you are using a baking stone or a dutch oven/ baking pan then pre-heat those in the oven too.
Remove the dough from the fridge, and remove the plastic bag. Lightly dust the surface of the dough with bread flour or rice flour. Gently rub the flour over the surface of the dough to make sure there are no sticky patches.
Gently turn the dough out onto a peel or whatever you are using to transfer it to the oven (dutch oven or baking pan).
Score the dough using a razor blade or a bread lame from one end to the other. Slide the dough onto the baking stone (or place it into a dutch oven or bread pan)
The loaf will bake for 20 minutes covered with a large pot or cover (or the lid from the dutch oven/baking pan) and for 25 minutes uncovered.
Leave to cool before slicing!
If you enjoyed the recipe and would like to support ongoing recipe creation and help keep the website ad-free, you can click below to make a contribution.
As an Amazon Associate, I earn from qualifying purchases.