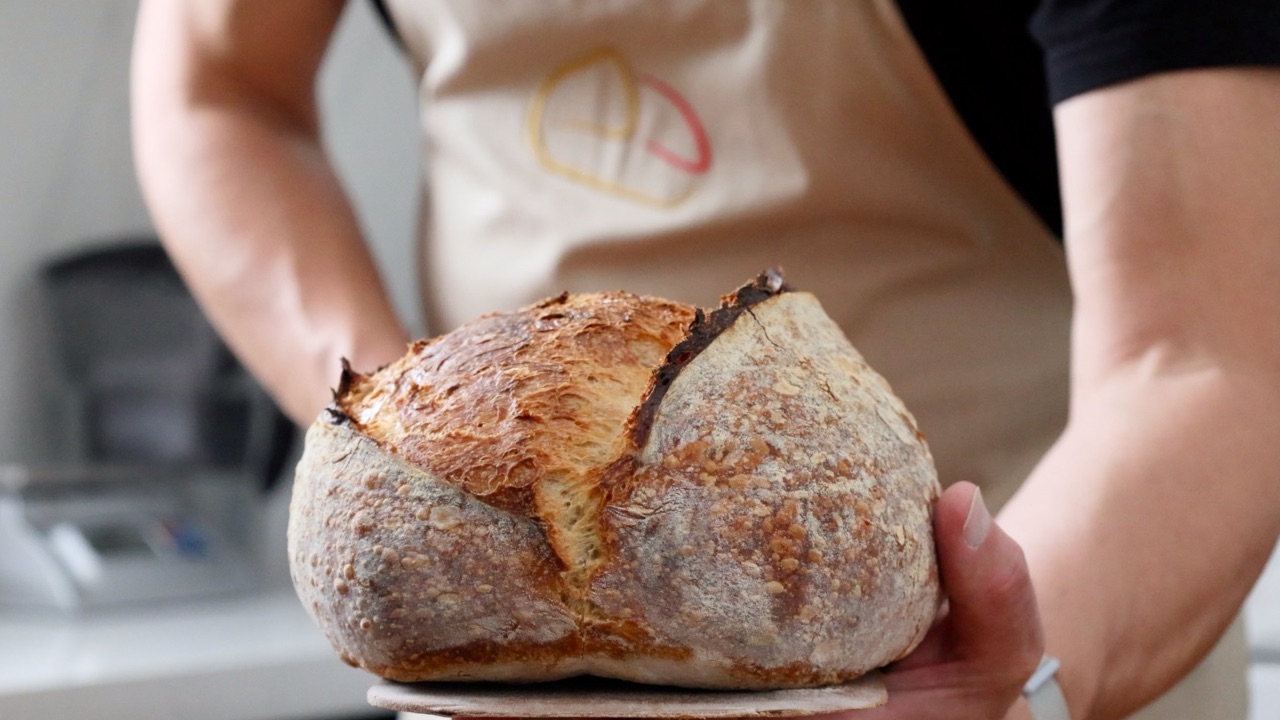
The Old Faithful Sourdough Recipe

I call this the Old Faithful because it’s reliable and produces an excellent sourdough loaf. We all have reliable recipes that keep us coming back time and time again to use them, this one is mine. I hope it becomes a staple in your sourdough baking recipe collection too.
Remember that the video covering the entire step-by-step process is available to watch at the bottom of this recipe.
Contents
- The vitals
- The equipment used
- How I schedule this bake
- Making the levain
- Making the main dough
- Bulk fermentation and stretching
- How do I know when the fermentation is complete?
- Shaping the dough
- Proofing the dough
- Baking
- Watch the tutorial on this blog
The vitals
This recipe produces a dough that weighs eight hundred grams at seventy-eight per cent hydration. I use ninety per cent strong white bread flour with a protein content of 13.2%, and ten per cent wholewheat flour.
The equipment used
I use a bench scraper and a bowl scraper to keep the mixing bowl and work surface clean and to minimise waste.
You’ll need a mixing bowl or a large pot to mix the dough.
Digital scales are essential for weighing ingredients accurately. Consistent weighing is far more reliable than measuring by volume.
This eight-hundred-gram dough is sized to fit an oval proofing basket measuring twenty-four centimetres by twelve centimetres by eight centimetres. A larger basket will work, but the dough may spread more during proofing.
For scoring, you can use a baker’s lame, a razor blade, or a very sharp knife. A proper lame offers better control and consistency.
A baker’s peel is useful but not essential. A flat tray or a stiff piece of cardboard works just as well, and making a simple peel is an easy, budget-friendly option.
I bake this bread on a baking stone to provide strong bottom heat.
All of the equipment mentioned here is included on my baking kit page.
How I schedule my time to bake this loaf
My timeline is based on a kitchen temperature of twenty-eight degrees Celsius (82F), your timeline will slow down or speed up depending on the temperature in your kitchen.
I make my levain at 22.00 the night before making the dough. The next morning around 08:00 when my levain is ripe or mature I mix the main dough.
After mixing I laminate the dough three times with a thirty-minute interval in between. The dough takes a total of five and a half hours to bulk ferment. The dough is shaped and placed in a basket and left for one hour to proof at room temperature before being placed in the fridge overnight and baked the next day.
Making the levain
Ingredients
21g strong bread flour
21g water
3g Ripe sourdough starter
Mix all of the ingredients and leave the levain to ferment. It is ready to use when it has increased significantly in size. I like to use my levain when it smells of green apples and bananas with a pleasant sour note, similar to sour milk. I’m looking for a fruity sourness and use it before it smells like vinegar.
I use a relatively small percentage of ripe sourdough starter to make my levain. The ratio works well for me because it will be ripe and active the next morning when I am ready to bake. The amount of starter you use to make your levain will depend on how quickly you want it to be ready.
Whichever feeding ratio you choose you will need forty-five grams of ripe levain at one hundred per cent hydration to make the main dough.
Making the main dough
Ingredients
378g strong white bread flour (mine has a protein content of 13.2%)
45g wholewheat flour (I use organic stone-ground)
325g Water (room temperature)
45g levain (the ripe active levain we made from the instructions above)
8g sea salt (I use fine pure sea salt)
Add the water to a mixing bowl followed by the levain. Give the levain a quick stir to break it up. Don’t worry about trying to dissolve the levain completely as the fermentation process will take care of that.
Add the strong white bread flour and the wholewheat flour to the mixing bowl and sprinkle the salt on top.
Bring the mixture together with a spoon until it becomes too stiff to stir easily. At this point, wet your hand and continue to mix, squeezing the ingredients together. Make sure you clean any of the dry bits off the side of the bowl.
After a minute or two, the ingredients should be well mixed. The aim isn’t to create a smooth dough at this point, it’s to make sure everything is well combined and there are no dry pockets of flour.
Cover the bowl and leave it on your work surface at room temperature to rest. Don’t overly stress about time, anywhere between fifteen to thirty minutes will be enough time for the flour to hydrate and make mixing easier. I find the sweet spot is thirty minutes.
Using a bowl scraper, turn the dough out onto your work surface and make sure you clean all of the dough from the inside of the bowl.
Mix the dough by kneading it to make sure that all of the ingredients are well distributed. This is complete when you can’t feel any lumps in the dough and it feels a similar texture throughout. It does not need to be silky smooth as the upcoming stretching and the long fermentation period will take care of that.
Cover the bowl and leave it on your work surface to bulk ferment.
Bulk fermentation and stretching
The dough will now be left to ferment. During this time the quality and handling of the dough will improve. It will also become more acidic, which will produce that wonderful sour taste that sourdough is so famous for.
The water and proteins in the flour will now work together, producing a strong dough that is capable of trapping the gas produced during fermentation. We’ll give it a helping hand by performing three sets of stretching on the dough.
Thirty minutes after kneading, turn the dough out onto the work surface. The dough is gently stretched out into a large square or rectangular shape being careful not to tear it. Spraying the worktop with a little water will help the dough from sticking.
Once you’ve pulled the dough into a rectangle take one side of the dough and fold it over so that it covers the centre third of the dough. Now repeat with the other side.
Take the bottom edge of the dough and fold it over the centre third, and then repeat by folding the top section over the centre.
You will be left with a small square or rectangle. Fold the corners into the centre and turn the dough over on the worktop. You will now have a rough dough ball which you can rotate to create a tighter ball.
Place it back in the bowl and leave it for another thirty minutes before performing the second set. Repeat once more so you have completed three sets of stretching.
This method is called laminating but if you prefer you can leave the dough in the bowl and simply pull it up folding it over itself. As long as the dough is sufficiently stretched and not torn you will achieve a smooth-textured dough and help build strength.
Leave the dough to finish the bulk fermentation.
How do I know when the fermentation is complete?
Ultimately, the dough needs to ferment long enough to develop a strong gluten network and build flavour. But we need to make sure that the dough isn’t left for too long, as it will overferment, and the dough will become unmanageable and lose its strength.
You can judge the bulk fermentation by the amount the dough increases in volume. For this recipe, I leave the dough to ferment until it has increased by seventy-five per cent of its original size.
This took five and a half hours at twenty-eight degrees Celsius (82F). Your dough may be quicker or take longer to reach the same size. Temperature, the levain and the flour will all have an impact, so use my times as a guideline and keep an eye on the progress.
Shaping the dough
This dough is relatively soft and at higher temperatures, I like to give the dough a quick pre-shape to tighten it up a little and give it a bit of strength.
I turn the dough out onto the work surface using a little flour to stop it from sticking. Don’t use too much; a little goes a long way.
I make sure that the surface of the dough that was facing upwards in the bowl is turned over and ends up facing downwards and touching the worktop, and the rough side is facing upwards.
I fold the bottom of the dough into the centre and then fold the top over the centre. Repeat with each side and turn the dough over. The goal is to create a firmer dough ball without degassing it.
Leave the dough to rest uncovered on the bench for fifteen minutes.
Now it’s time to shape and place the dough in the basket. Sprinkle a little flour on the worktop and use your scraper to push it under the dough while releasing it at the same time.
Turn the dough over. Fold the bottom over and stick it just under the centre of the dough. Pull the two sides of the dough outwards and fold them over the centre making sure they stick. Roll the top edge of the dough over to create a large cylinder. Pinch the seam closed where the dough meets.
Be light-fingered with this process the aim is to retain as much gas in the dough as we can.
Dust the dough with rice flour and place it into the sourdough basket with the seam facing upwards. Place into a plastic bag to stop the dough from drying out.
Proofing the dough
Once shaped, the dough is placed into the basket and left to settle into its final shape. This rest also allows the dough to regain some of the gas lost during shaping, leaving it ready for baking.
At around twenty eight degrees Celsius, the dough proofed for one hour before being placed into the fridge for an eighteen hour cold proof.
Fermentation doesn’t stop as soon as the dough goes into the fridge. The dough temperature drops gradually, and proofing continues for several hours as it cools.
I use the poke test to judge when the dough is ready for the fridge, gently pressing the surface to assess how inflated it feels and how it responds. As a general guide, the dough should feel light and aerated, with the indentation slowly easing back over three to four seconds.
The dough should be covered in the fridge and can be held there until baking the following day.
Baker's tip: Using the poke test isn’t easy. It takes time to build the sensory awareness needed to read the dough reliably. Until that feel is properly dialled in, volume tracking gives you a much clearer reference point.
See how I track proofing by volume instead of guessing
Baking
I preheat my oven to two hundred and twenty degrees Celsius (430F) with my baking stone placed on the lower third shelf.
I use a laser thermometer to see when the stone hits two hundred and ten degrees Celsius (410F). Now I’m ready to bake.
I remove the basket from the fridge and take it out of the plastic bag. I sprinkle a little flour onto the top surface of the dough and turn it over so the dough drops lightly onto my bread peel. I score the dough with a baker's lame so it can rise and open easily in the oven.
The dough is slid onto the baking stone and I cover it with a large pot to maintain a moist baking environment.
The sourdough bakes for twenty minutes covered with the pot and a further twenty-five minutes uncovered.
I leave my dough to cool completely to room temperature before slicing.
Watch the "Old Faithful" video
As an Amazon affiliate, I earn from qualifying purchases