A Devilish Takeaway Style Deep Pan Pizza Using Sourdough Discard
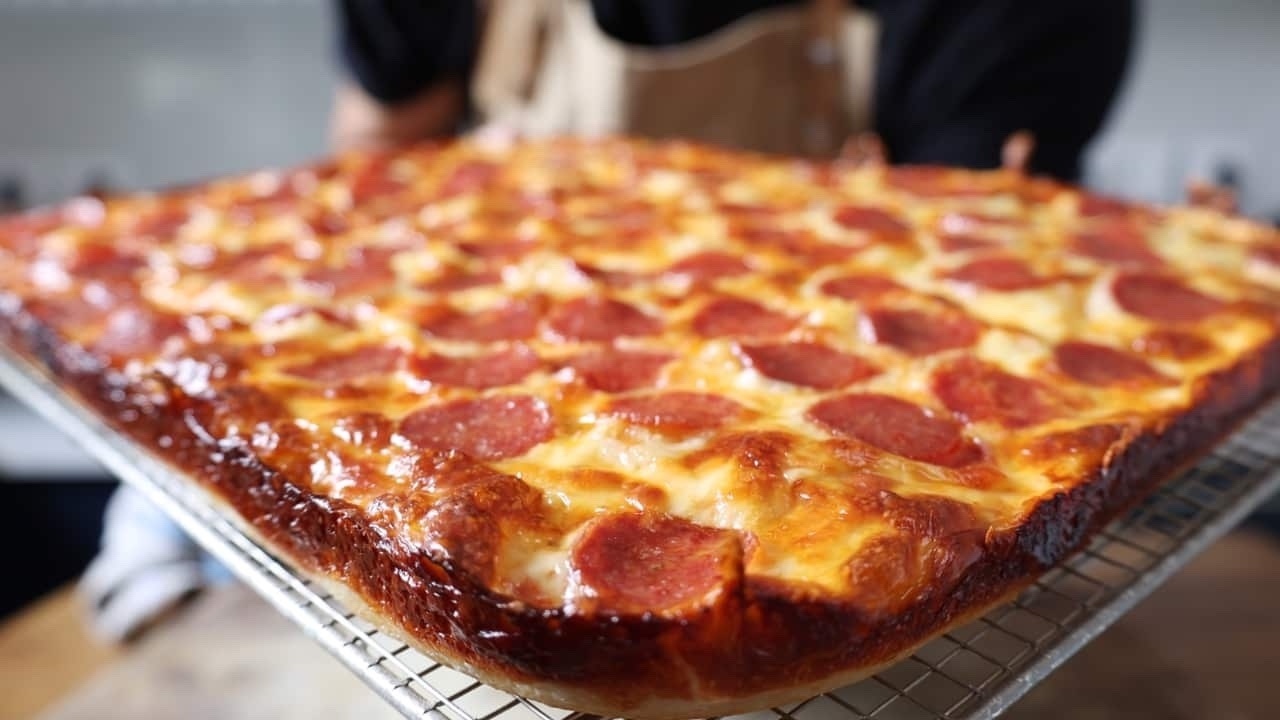
You won't be reaching for a takeaway pizza menu after baking this hybrid pan pizza. It produces a light, airy and crisp base that’s packed with flavour from the sourdough discard and pre-fermentation.
The normal pizza crust is replaced with a lacy crispy caramelised cheese crust that can only be described as an umami flavour bomb.
The pizza base is substantial and makes for the perfect foundation to daringly top the pizza with lots of ingredients.
I’ve shared my favourite topping for takeaway pizza, pineapple and pepperoni. This definitely doesn’t disappoint but I’d also encourage you to get creative and build your ultimate takeaway pizza.
Don’t forget you can watch the full video tutorial lower on the blog.
The vitals & baker’s percentages
Recipe formula
The baking timeline
Adjusting for temperature
The equipment you’ll need
Yeast substitutions
The recipe
The recipe video tutorial
Quick reference printable recipe card
The Vitals & Baker’s Percentages
My kitchen hovered around the 23C/73F temperature mark while making and documenting this recipe.
This recipe makes 730 grams of dough which fits perfectly in a 42x31cm (16”x12”) tray. In the recipe section, I have also included dough ingredients that fit a 33x23cm (13”x9”) baking tray.
The dough is made with 100% strong white bread flour (protein content 13.2%) and the hydration is 75%.
The sourdough discard is 30% and the pre-ferment is also 30%
The salt is 2.2% and I use 5% extra virgin olive oil.
Everyone has a different idea of how thick a pizza base should be, so you may want to tweak this recipe don’t waste time trying to work out the measurements by hand. Download a copy of my free sourdough calculator. It’s accurate, quick and easy to use.
Recipe Formula

The Baking Timeline
This is the timeline I used during testing this recipe.
Day 1
22:00 Mix the pre-ferment (5m)
Day 2
9:00 Mix the dough (15m)
9:30 The dough gets a quick knead (5m)
11:00 The dough is laminated or stretched (5m)
12:00 The dough is shaped and proofed (20m with 1 rest)
13:00 Make the sauce and prepare the toppings (15m)
13:30 Add the toppings and bake (15m)
Total time: 15h 30m
Hands-on time: 1hr 30m (depending on skill level)
If the pre-ferment is fermented at a moderate room temperature, the ideal timeline for using it will be between 12-18 hours (after mixing). So there is lots of room to play around with the schedule on day two.
Adjusting for Temperature
The timeline is based on a kitchen temperature of 23C/73F.
Don't forget, the warmer your kitchen is the quicker the pre-ferment and dough will ferment. If your kitchen is cooler the slower the process will go. This is nothing to stress over, but it’s good to keep in mind.
The Equipment You’ll Need
You’ll need scales for weighing the ingredients. A bowl and bench scraper will make handling the dough a lot easier but they aren’t essential.
You will need a non-stick baking tray. I used to use a 33x23cm (13”x9”) Chicago non-stick tray but I couldn’t fit two of them in the oven together.
So I found a large 42x31cm (16”x12”) Masterclass baking tray, great for baking one giant pizza. It fits perfectly on top of my baking steel and has a tough non-stick coating.
I use a baking steel to increase the speed of baking on the bottom of the pizza. This isn’t a necessity, if you don’t have one, don’t worry.
As an Amazon Associate I earn from qualifying purchases.
Yeast Substitutions
I’m using instant dried yeast in this recipe. If you want to use fresh yeast you can double the quantity.
If you are using another type of dried yeast then use the same amount specified in the recipe.
Don’t stress over the amount of yeast too much. A little can go a long way and we are using a small quantity in this recipe to extend the pre-fermentation and the fermentation of the main dough.
It helps to think of yeast as speed control. The less you use the longer the process will take, the more you use the quicker things will go.
This can be helpful if you are working in a hot climate as reducing the yeast will slow things down.
Just remember that using a lot of yeast in a recipe produces a heavy commercial yeast flavour in the final product.
Whereas a longer fermentation process results in a beautifully textured and mature-tasting pizza base.
The Recipe
The Pre-Ferment
I mix the pre-ferment the night before I bake. At a moderate room temperature, it will sit happily on the kitchen countertop overnight and be ready to use the next day.
There is quite a large window of time in which to use the pre-ferment, anywhere between 12-18 hours after mixing will work well. You’ll be able to mix your pizza at any time during the second day.
The recipe makes a touch more pre-ferment than is needed to allow for any residue that gets left behind in the jar.
Ingredients - large 42x31cm (16”x12”) tray
66g strong white bread flour
66g water (room temperature)
0.6g instant dried yeast
Ingredients - medium 33x23cm (13”x9”) tray
40g strong white bread flour
40g water (room temperature)
0.3g instant dried yeast
Place the water, flour and dried yeast into a large jar or bowl. The container should be large enough to accommodate the mixture quadrupling in size.
Mix everything with a spoon. The mix doesn’t need to be smooth but you shouldn’t be able to see any dry spots of flour. During the fermentation process the dough will sort itself out and any lumps will disappear.
The Pizza Dough
Dough Ingredients - large 42x31cm (16”x12”) tray
280g strong white bread flour
180g water
9g salt
120g sourdough discard
120g pre-ferment
1.4g Instant yeast
20g olive oil
Dough Ingredients - medium 33x23cm (13”x9”) tray
160g strong white bread flour
104g water
5g salt
69g sourdough discard
69g pre-ferment
0.8g Instant yeast
12g olive oil
The Pizza Toppings
Pizza toppings - large 42x31cm (16”x12”) tray
250g good quality pre-grated plum tomatoes
Oregano (a good pinch)
Thyme (a good pinch)
Salt (a good pinch)
Pepper (a good pinch)
200g diced pineapple
500g grated mozzarella (low moisture)
160g sliced pepperoni
Pizza toppings - medium 33x23cm (13”x9”) tray
150g good quality pre-grated plum tomatoes
Oregano
Thyme
Salt
Pepper
120g diced pineapple
300g grated mozzarella (low moisture)
90g sliced pepperoni
Mixing the Dough
Don’t forget that you can watch the video tutorial further down the blog. It shows each step in detail.
Add the water and salt to a mixing bowl and stir with a spoon until the salt has dissolved.
Add the yeast, olive oil, sourdough discard, pre-ferment and flour to the mixing bowl.
Stir the mixture with a spoon until everything is well combined. As the flour in the discard and pre-ferment is already hydrated the dough will be quite wet so it’s easy to mix.
Now wet your hand and work the dough for about a minute or so using a pinching motion. The aim of the game is to make sure the ingredients are well combined and there are no dry pockets of flour.
Cover the bowl and leave the dough to rest for 30 minutes.
Kneading the Dough
Turn the dough out onto your work surface and knead for about two minutes.
Think of this stage as the second part of mixing. We want to make sure the pre-ferment and the sourdough discard are well distributed through the dough.
Don't worry about developing a smooth dough right now, that will come in the next step.
Once you are happy the dough is well-mixed use your bench scraper to form the dough into a ball. Place it back into its bowl, cover it, and leave it to ferment again.
Stretching the Dough
Keep checking in on your dough to see when it increases in volume by about 75%, my dough took about 1.5 hours.
Turn the dough out onto your work surface and gently pull it into a large rectangle. Resist the urge to dust your worktop with flour, if you are worried about the dough sticking you can spray the bench with a little water.
Fold the dough lengthways into three by folding the right side over the centre third, and the left side over the centre.
Now fold the top of the dough over the centre and then the bottom. You should be looking at a rough square with 9 layers of dough. In the video tutorial, I show you exactly how to do this.
The aim here isn’t to build strength, it’s to gently de-gas the dough so we can leave it to ferment and rise again without collapsing. The folding action will also condition the dough. When you shape it into a ball you should feel that the handling properties have improved.
Now shape the dough into a ball and pop it back into the bowl, cover it and leave it to ferment again at room temperature.
Shaping the Dough
After about an hour at ambient room temperature, the dough should have increased in volume by about 75% - 100%.
If your dough hasn’t quite grown that much, pop the lid back on the bowl and wait a bit longer.
Coat the inside of your nonstick oven pan with olive oil and use your hand to evenly distribute it.
Turn your dough out into the tray, flipping it over a couple of times to coat it in the oil. With the smooth surface of the dough facing up, gently pull the dough out to fill the tray.
Make sure you even out the dough as you do this to avoid any thin areas.
The dough may start to recoil back and become difficult to stretch. Don’t fight it. Cover the tray and leave it to rest for 5-10 minutes. The dough will now stretch easily again. You can repeat this step a few times if needed.
Once the dough is evenly covering the bottom of the pan cover the tray and leave it at room temperate to proof.
Making the tomato sauce
The sauce for this recipe is super simple and delicious. The secret is to choose a very good quality tinned tomato from the shop. Pre-grated will work perfectly but if you can only find whole tomatoes you can whizz them quickly in a food processor, or crush them by squeezing them through your fingers.
Season the grated or crushed tomatoes with thyme, oregano, salt and pepper. Stir well to combine and taste to check the seasonings are correct.
Topping the pizza
After an hour the pizza base should be puffy but not at the point of collapsing.
I’ll run you through the topping ceremony for my favourite pizza, but I’d encourage you to use your favourite ingredients.
Take your time to evenly coat the pizza base with the tomato sauce. Lay half of the pineapple pieces over the sauce.
Build your cheese around the edges of the tray, this will create a crispy lacy cheesy edge. Now cover the area in the centre with the rest of the cheese.
Add the rest of the pineapple and finally add the sliced pepperoni.
Baking the pizza
Set your pizza stone or steel on the lower third shelf and pre-heat the oven to 250C/480F. Five minutes before you place the pizza in the oven turn the temperature down to 220C/430F.
Slide the pizza into the oven and leave it to bake for 20 minutes.
If you are baking without a baking stone or steel follow the same procedure but extend the baking time by 5-10 minutes.
The pizza is ready when the cheese is bubbling and beginning to develop golden spots. Before taking the pizza out of the tray, lift the corner to check the base is baked correctly.
Remove the pizza from the tray and leave it to cool on a wire rack for 5 minutes before diving in!
If you enjoyed this recipe and would like to support ongoing recipe creation and help keep the website ad-free, you can click below to make a contribution.
As an Amazon Associate, I earn from qualifying purchases.