Sourdough Pain de Mie

The Design Brief
When I set out to develop this recipe, I had a couple of key goals.
Firstly, I wanted a super soft white sandwich loaf, one that wasn't too rich or too sweet, but held on to its softness. Secondly, it needed to fit into my life easily. I didn't want to mess around making bespoke levains; I wanted to use the same liquid starter I use for all my lean sourdough loaves.
So I've kept the classic pain de mie baker's percentages, but restructured the architecture, swapping the baker's yeast for a liquid sourdough starter.
The result? A super soft loaf that's perfect for big doorstep or thinly sliced, delicate sandwiches, and equally good for grilled cheese and French toast.
A sourdough pain de mie like this is nearly impossible to find on a bakery shelf, so the best way to get one is to bake it yourself.
Quick Navigation
- Recipe Status
- Equipment Used
- Baking timeline
- Formula Design
- Bake the Recipe
- Flavour Profile
- Development Notes
- What’s Next?
- Watch the Video Tutorial
Recipe Status
Version 1.0
Published: June 2026
Last Updated: June 2026
The recipe shown here is the one I’m currently baking. As new ideas emerge, new experiences are gained, and my understanding of the loaf deepens, this page may be updated to reflect that journey. The development notes below document the history of the loaf and the decisions that shaped it along the way.
Equipment used
I mixed this dough using the Ooni Halo Pro spiral mixer. For weighing ingredients, I used my My Weigh KD8000. I baked in Chef Made Pullman tins, and this formula is sized specifically to fit them. You can pick up the same tins from my baking kit page.
If you'd rather use tins you already have, Magnus, my sourdough calculator, will scale the dough to suit.
Baking Timeline
Before we get into the timings, it’s worth remembering that these reflect my bake, not yours.
Both the starter and dough were fermented at a steady 24°C / 75°F in a temperature-controlled proofing chamber. If your kitchen is warmer, cooler, or your starter behaves differently, your timeline will probably look different, too.
Treat the timings below as a reference point and pay attention to what your dough is telling you along the way.
Day 1
23:00 Build starter
Day 2
08:00 Mix pre-dough and rest
09:00 Mix the dough
10:30 1st coil fold
11:30 2nd coil fold
12:30 3rd coil fold
16:00 Divide and pre-shape
16:20 Shape, tins and ambient proof
19:20 Bake
20:10 Cool
Total time: 21 hours
Hands-on time: 1 hour
Formula Design
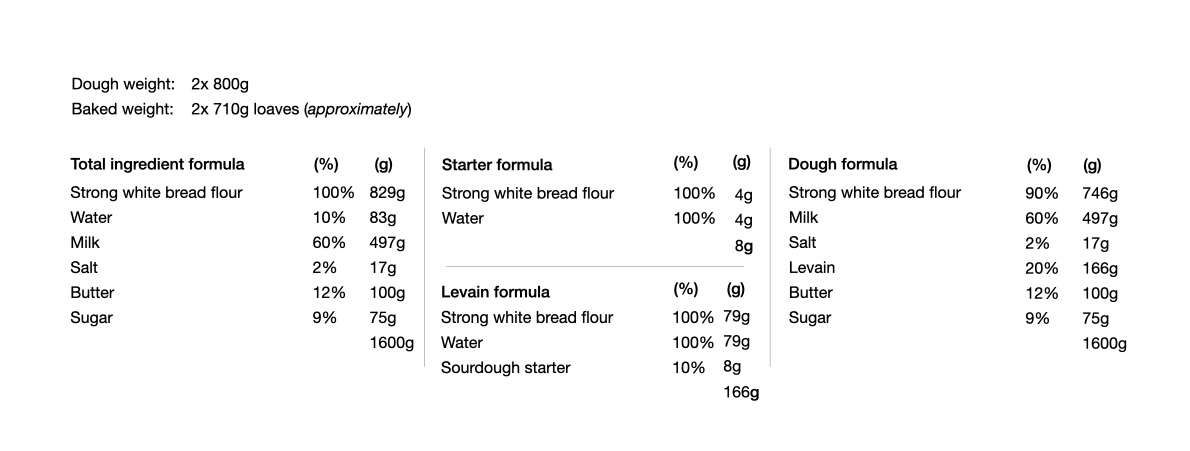
This recipe produces two sourdough pain de mie. I chose to keep the starter/levain simple: a 100% hydration liquid starter built with bread flour. This is handy because if I want to bake this alongside other sourdough recipes, I don't need to make a dedicated levain. I just increased the amount of standard liquid starter I'm already making, which keeps everything streamlined.
The formula uses 12% butter and 9% sugar, which puts it cleanly in classic pain de mie territory. Hydration sits at 70%, with 60% coming from the milk and the remaining 10% held in the starter.
For the flour, I've gone with a high-protein white bread flour. It stands up well to the long fermentation and keeps the whole process straightforward.
Salt is set at 2%. It's an enriched dough, so I'd recommend a mixer rather than mixing by hand.
A sourdough recipe calculator is a great way to design your own formulas, or to tweak other bakers' recipes to suit your ingredients, schedule and climate. You can download my free Magnus Jr sourdough calculator here.
Bake the recipe
Building the starter/levain
90g high-protein white bread flour
90g water
9g sourdough starter
Method:
1. Add the flour, water, and sourdough starter to a jar and mix thoroughly. (The jar should have enough headroom for the starter to quadruple in size.)
2. Cover with a lid and leave to ferment overnight.
Baker's tip: We make slightly more levain than needed for the recipe to account for weight loss during fermentation, wastage, and to leave enough left over to seed our next levain. This build uses a low inoculation to keep acidity in check and support a balanced fermentation, and helps with scheduling.
The dough
746g high-protein white bread flour
497g milk (3.5% fat content)
17g salt
166g active starter (from above)
75g white granulated sugar
100g unsalted butter (I use Lurpak)
Baker's Note: This is an enriched dough, so I'd recommend mixing it with a machine rather than by hand. It needs proper development to build strength around the butter and sugar, which is much easier to achieve mechanically. I use my Ooni Halo Pro spiral mixer.
Mixing the dough
Baker's tip: Enriched doughs tend to take longer to ferment than lean doughs. So to avoid stalling the fermentation any further by adding cold milk, I warm the milk gently until it comes up to room temperature.
1. Add the milk, flour and sourdough starter to the mixer bowl and bring together into a rough dough, so no dry patches of flour remain and the starter is well distributed. Leave to rest for one hour. Even though I'm using a mixer for this recipe, I still do this part by hand, but feel free to use the mixer if you prefer.
2. After the rest, load the bowl onto the mixer and begin mixing on 10% power / 75 RPM. Continue mixing until the dough develops strength.
Baker's tip: At this stage, I'm not looking for a full windowpane. I just want the dough to feel smooth and cohesive, with enough strength that it can stretch easily without tearing.
3. Sprinkle the sugar over the dough and continue mixing until the dough becomes smooth again and you can no longer feel the grainy texture from the sugar.
4. Sprinkle over the salt and continue mixing until the dough becomes smooth again.
5. Now add the butter in three stages. Between each addition, allow the mixer to fully incorporate the butter before adding the next. Don't rush this stage; patience wins every time. It took a total of eight minutes to incorporate the butter properly.
6. After the final addition, let the dough mix until it's smooth and stretches without tearing.
7. Turn the dough out onto your worktop, pull it into a ball and place it into a container to complete bulk fermentation.
Stretching the Dough
During bulk fermentation, I usually stretch the dough 3 times, though it depends on the length of the bulk.
The first stretch happens around 1 hour after mixing has finished, the second about 1 hour after that, and the third an hour after that. If your bulk fermentation runs around 8 hours from the initial mix, you'll probably only have time for 3 stretches before it's time to pre-shape. If your bulk runs longer, you may fit in one more.
Don't over-stress this. Judging when to move through each part of the fermentation chain matters far more than whether you gave the dough one extra stretch.
I prefer to coil fold this dough in the container, but you can stretch it on the countertop or laminate it instead, whichever feels more comfortable.
Here's the coil fold I use, in case it's helpful:
1. Slip your hands under the dough while it's still in the container, positioned slightly forward of centre.
2. Lift, and as you do, stretch the dough upward, extending it as far as it will go. You're not trying to lift the whole thing out of the container. You want the stretch to finish with the part of the dough closest to you still in the container, and the part furthest away hanging free.
3. Let the front piece fall back into the container, then lay the top piece over it.
4. Now rotate the container 180 degrees and repeat exactly the same motion.
5. Now pick the dough up and rotate it 90 degrees in the container.
6. Cover the dough and leave it to continue bulk fermenting.
You can see the whole thing in action in the video at the bottom of the page.
Shaping the dough
Once the dough has increased in volume by roughly 75%, it's time to pre-shape.
As I mentioned earlier, this formula was designed around the Pullman tins I use. The dough must fit the tins properly, so either use the same tins (or the same size), or resize the dough to fit your own. You'll find the tins I use in my baking kit.
1. Weigh the entire mass of dough and divide it by six to give you the individual dough ball weight.
2. Divide the dough into six pieces at that weight, using a set of scales so they're all the same size.
3. Loosely shape each piece into a ball and leave them on the countertop, uncovered, for twenty minutes.
4. Place a piece of dough in front of you, upside down on the countertop, so the smooth surface is facing down.
5. Gently push the dough down to create a circular shape. Lift the two sides and fold them into the centre.
6. Roll the dough towards you, pushing forward slightly to build surface tension. When you reach the end, seal the dough together.
7. Repeat with two more pieces, then place all three side by side in the tin.
8. Now repeat with the remaining three pieces and place them into the second tin.
9. Slide the lid onto each tin and leave the dough to proof until it reaches the underside of the lid.
You can see exactly how I do this in the video at the bottom of the page.
Baker's tip: Arranging three equally sized dough balls like this means they rise evenly and fill the tin perfectly.
Baking the loaves
I like to keep an eye on the dough as it proofs. Once it's risen up the tin and sits a couple of centimetres from the lid, I pre-heat the oven to 220°C / 428°F using bake mode, with no fan.
Baker's tip: I find I get a more even bake and crumb colour baking directly on the oven shelf, rather than using a baking stone or steel.
1. As soon as the dough has risen to touch the underside of the lid, place the tins on the bottom shelf of the oven to bake.
2. My loaves took 50 minutes to bake, reaching an internal temperature of 97°C / 207°F.
3. Remove the loaves from the tins immediately and leave to cool completely on a rack before slicing.
Baker's note: It can be tricky to tell when tinned loaves are baked through. I use a Thermapen instant-read thermometer to judge by temperature; it's by far the quickest, easiest and most accurate way. You'll find the Thermapen here in my baking kit.
Flavour Profile
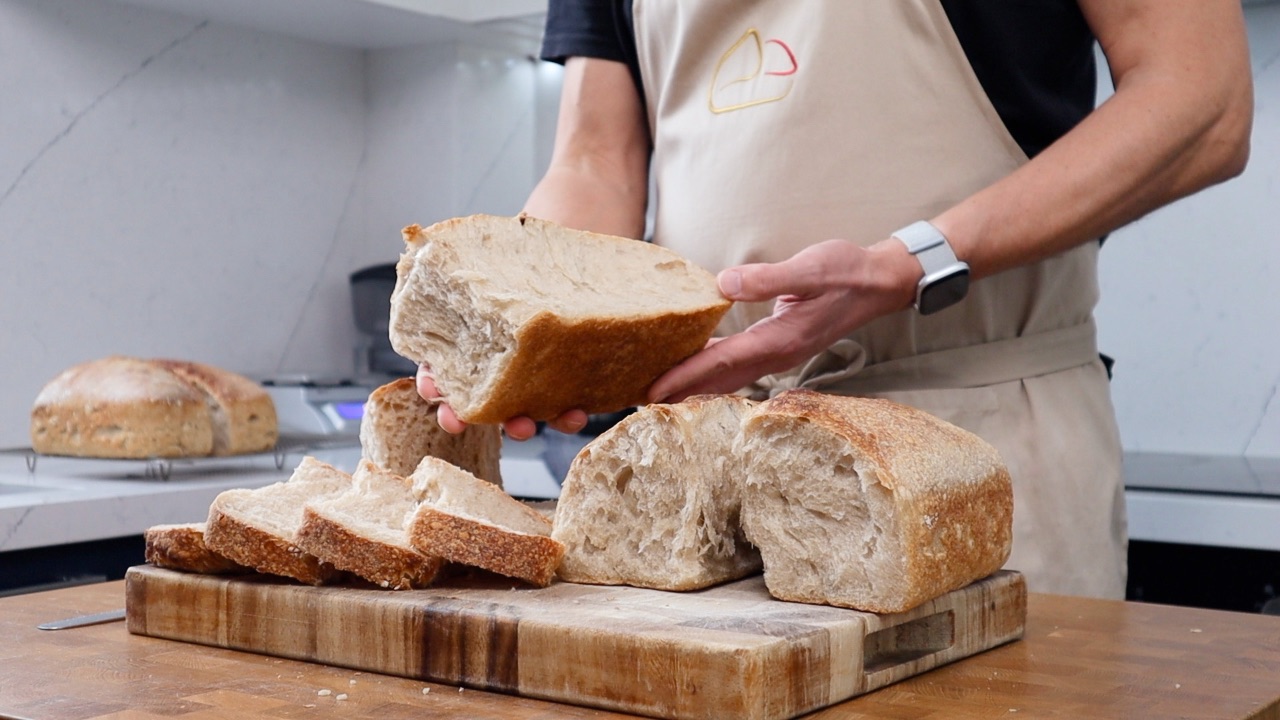
The first thing you notice is how soft this loaf is. The crumb is fine and even, light without being fragile, and it stays that way for days.
The crust sits in nice contrast to it, just a little firmer but still tender, and it carries more of that gently toasted flavour from the bake. Nothing hard or chewy, exactly what you want from a sandwich loaf.
The flavour itself is a careful balance of richness and sweetness. The butter and milk give it a soft, rounded character, and the sugar brings just enough sweetness to sit comfortably without tipping into a sweet bread. Underneath it all, there's that quiet sourdough character, subtle here rather than sharp, which is exactly right for a pain de mie.
Development Notes
Scheduling: Enriched doughs tend to ferment more slowly. To protect the butter and stop the dough from becoming greasy, I ferment at a slightly lower temperature than I would a lean dough, which extends the fermentation chain further. Even if I mix first thing in the morning, I won't be baking until late afternoon or early evening.
Enrichment: I'd thought about adding more enrichment, egg yolks, or a higher percentage of butter. But after the first test bake, I decided not to play around with it any further. The current level, 12% butter and 9% sugar, works extremely well. The bread is super soft but still easy to digest, and the sweetness is perfectly balanced.
Where Next?
I'm extremely happy with this formula and the resulting loaf. It hits the brief perfectly, and while I may tinker slightly, I don't think you'll see any big changes here.
There are a few things I do want to test, though. On the starter side, I'd like to try a sweet starter, or perhaps a pre-dough, in place of the liquid starter, and see what they bring to the dough.
I'm also curious about the flour. I want to test substituting some of the high-protein bread flour for a lower-protein white flour, to see if I can soften the crumb further while still holding enough structure for a clean bake.
I'd like to develop a fully plant-based version too, swapping the butter and milk for plant-based alternatives to see if I can match the results, or better them.
And there's the schedule. I much prefer baking in the morning so I can enjoy the fresh loaf throughout the day, so I'll be trying an overnight bulk ferment, shaping first thing and baking mid-morning.
Watch this space.
Watch the Video Tutorial